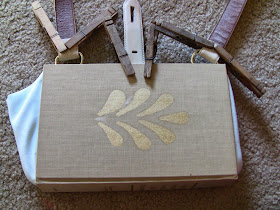
Have you ever seen a really cute purse designed to look like a book that you loved, but maybe could not afford or find for sale? Luckily for everyone who's had this problem or who is just looking for a fun project to try, this tutorial will teach you how to make this:
While this might seem a little out of the comfort zone for some of you, it's actually very easy. And with materials coming only to about $5, it's a lot more affordable than any premade book purses you will be able to find for sale. Hopefully by now you're starting to feel a little more confident, and if not, continue on and look through the pictures until you do- this post will be very picture heavy.
For materials, you will need:
*A hardcover book- easily sourced from any thrift shop for very little. Both books shown at the top were only twenty-five cents apiece. If you find a hardcover in a color you like but that is lacking in cover design, don't stress- you can either collage the cover or use the next two items.
*Stencils and masking tape. (optional) I got a pack of 48 from Walmart for under $4, and you can reuse the stencils for countless other projects so it really is money well spent. Plus you can find stencils for almost any design.
*Paint. (optional) Spray paint obviously is the simplest to use, but if you don't have any and are tight on money, you can use other paints, paint markers, or even nail polish. Best of all, by doing this, you can not only liven up a dull looking book, you can also color coordinate your book to match any outfits you want to wear the purse with.
*An X-acto or other similar knife. I simply used a refill razor blade because I have some on hand at all times.
*Scissors.
*Clothespins (optional, but they will save you a lot of trouble)
*Fabric- enough to line the inside of the book and create sides. The amount will vary with the size of your book, but it will require less than a yard. This can also often be found at thrift stores, and if you are very tight on money, you can even buy a cute pillowcase from a thrift store for less than a dollar and use it. Keep in mind that thicker or stiffer fabrics will hold their form on the sides of the purse better than very thin or flexible fabrics.
*An old belt, (long enough to make a handle from) heavy ribbon, old purse, or purse handle kit. I personally prefer to use belts, but old purses will save you some work as the handles will be ready to use as soon as they are cut off.
*Superglue or some other similar glue. The amount needed will vary with the size of the book, but 2 to 3 .12 oz tubes were enough for mine. Check your local dollar store, mine carries twin packs for a dollar apiece.
*Ribbon (less than a yard) or some other item to hold your purse closed. I used belt remnants and a button for mine, but you can use ribbon if you prefer to tie yours shut. If you chose to use an old purse for the handles, you may be lucky enough to find one with a magnetic snap you can use with the belt strap instead of a button.
*Needle and thread (if you used a button closure)
*D-rings. (optional) I just liked the way they pull the look together, and if your straps do not have enough length to fasten inside of the book, this is an easy way to make your strap still work. A set of four will run about $2 at Walmart.
*Cardboard the size of the book's spine
Step one:
Using your knife, cut the inside seam connecting the cover to the book binding as shown. This will be easiest if you start at the end where you can see where they connect.
 When finished, you will now have this:
Step two:
Cut your belt or other handle material to the needed size, unless you are using a premade handle. If you want a strap to close it with like I used, make sure to leave a piece long enough to fasten at least an inch inside and pull it another inch or two down the side of the front cover. Cut a buttonhole in this piece. (Glance down to step 5 to see this, I forgot to cut my buttonhole for a bit.) Also cut an inch long strip for your button if you are using this method.
Step three: (optional)
If your book is rather bland, now is the easiest time to add a design onto the cover. If using stencils, tape them snugly into place and paint a design. (Be sure to leave an undecorated area for the strap if you use a button closure like I did.) I used gold because I already had gold spray paint, but the color is fully up to you.
When finished, it will look something like this:
Step four: (Skip if using a ribbon tie closure)
If you are using a buttoned strap, sew the button to the 1 inch section of belt. To make sure mine would hold up to a lot of use, I used a needle to make holes and then used very fine wire to fasten the button to the leather. Keep in mind that a shank button is advised for this type of closure. Superglue the button square to the front cover of your book, centered and as close to or far from the edge as you wish while keeping it close enough for your strap to reach it.
Step five:
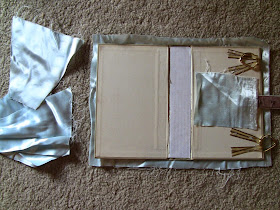
On the inside of the back cover, glue your closure strap or ribbon, making sure that it will line up with your button. If using a ribbon tie closure, glue a corresponding length of ribbon to the inside of the front cover. If using D-rings for your handle, use sections of ribbon to anchor them to the back cover as well. If you are not using D-rings or ribbon to thread your handle through, then glue your handle ends to the inside cover at this point. An overlap of at least 1 1/2 inches is advised for durability. Also glue a length of cardboard onto the inside of the spine to provide extra support.
Step six:
Stand your book up on end and open it to however wide you want to be able to open your purse. Trace the border onto paper allowing a 1/2 inch extra edge.
Use this pattern to cut four pieces of fabric to form the ends of your purse. Lay your book cover flat and cut a rectangle of fabric to line your purse, again giving a 1/2 extra edge. If you want to add a pocket to your lining, go ahead and cut one out now as well. Iron the fabric.
Step seven:
Take two end pieces of fabric and sew together on the top edge only, right sides together. Turn so wrong sides are together and stitch the remaining sides together. Repeat with the other two end pieces and iron flat. If you are adding a pocket, go ahead and stitch it to your lining rectangle wherever you want it located once finished.
Step eight:
Glue one side of the side fabric to the inside edge of your book cover, on what was originally the top or bottom with the book. (I like to start with the front cover) Give an overlap of half an inch and allow the glue to dry for at least 10 minutes, preferably while weighted down with whatever you have on hand to help the seam to dry smoothly and tightly. While this is drying, you can repeat this step with the other side piece of fabric. Fold the lining rectangle edge under half and inch and glue it down on the long side of the front cover. I forgot to take many pictures of this step, but below you can see how the pieces should look when glued down.
Glue the other long ends of the side pieces to the back cover. Start with just the first inch and let it dry before you glue down the whole side, this will help stabilize it since you can't lay the whole thing flat at this point.
Once this section dries, go ahead and glue the whole side down. Then make sure the bottom edge is tucked inside smoothly before gluing it to the inside of the spine.
Now glue the lining to the inside of the spine in the same way, and continue gluing it to the cover so it matches the first side.
(Enjoy viewing my method of applying pressure below)
Step nine:
If you used D-rings or ribbon to fasten your handle to, this is now finally time to add the handle. If you're feeling a little brave, you can stitch the ends to the D-rings, if you aren't, you can glue the ends to themselves. Just make sure to keep this pressed tight while it dries, as this part will be under the most stress.
Also, if you are using D-rings but your belt or handle is too wide to fit smoothly, cut small notches where it folds over the ring to make it work.
And that's it, you're done! Now all you have to do is enjoy your new purse. :)


No comments:
Post a Comment